| Rendering/ Lighting |
LightingIntroductionA light source is a geometric object which radiates light of its own color. If a light object is black, it doesn't radiate light at all. A white object radiates all the main components (Red, Green, Blue) of light in the same amounts. In real life, it is usually rather difficult to observe objects in lighting which have only one wavelength. Also, there isn't a material which would reflect only one wavelength. In Realsoft 3D, all this is possible, so you should be careful when selecting light source colors. For example, a totally red object isn't visible at all under blue lighting, because a red object doesn't reflect any blue light. A violet object looks red under yellow lighting. Usually, it is advisable to create white light sources, so all objects will be rendered in their 'true' colors. Although the number of light sources is unlimited, they shouldn't be used indiscriminately. The time taken by rendering is greatly dependent on the number of light sources. Light sources don't show directly in shaded pictures. So, if you want to see lamps or reflections of the light source on reflecting surfaces, you must put a cover made of, say, matte glass around the light source. Unlike material mapping objects, light sources affect the whole scene regardless of their position in the object hierarchy.
Shadows on a floorIn the next example, we will test different light sources. The example includes a cylinder floating above a rectangle (floor), and some light sources casting shadows onto the floor (see the figure below). Tutorial level: Beginner Example project: 'tutorprojects/rendering/lightsources' 1. Take a top view. Create an analytic rectangle (the floor), almost filling the whole view. 2. Create an analytic cylinder in the middle of the rectangle. 3. Go to the front view. The objects lie at the same level. Select the rectangle and move it to the bottom, then select the cylinder and move it above the rectangle. You may also change the colors of the two objects if you like. 4. Rotate the view upwards. Hit the '0' (zero) hot key to render the view.
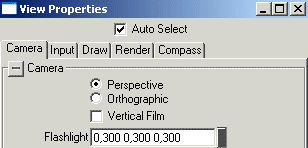
The camera flashlightThe rendered image above shows that objects float in empty black space. However, we can see them - where does the required light come from? The answer is from the camera that took the picture. All camera objects, including view window's internal camera, include a flashlight. The flashlight is quite a handy feature: it makes objects visible without actual light sources and also adds a suitable fill light to your images. Flashlight comes from behind the camera and therefore illuminates every visible place of the scene. To adjust the flashlight: 5. Select 'View Properties..' from the view window's popup menu. Go to the 'Camera' tab of the view property window and enter a new value '0.3 0.3 0.3' to the 'Flashlight' field. Then close the view property window.
Changing the flashlight color Note: this changes the flashlight of the view window. In file rendering, the flashlight comes from the current camera object. Therefore, when preparing a real project for file rendering, remember to assign flashlight changes to the camera object after finding a suitable brightness level using view window rendering tests. Now the flashlight is quite dim and we need some light sources to see the objects properly.
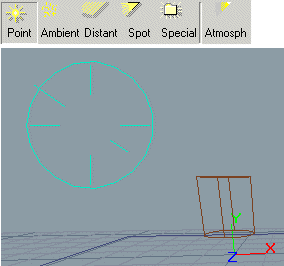
Adding a point light source6. Take a front view. Go to the 'Light Sources' tool tab and click the 'Point' icon. Then click on the top and left side of the cylinder in the view window. When you now move the mouse, you can see a radiating circle. The radius of this circle will later define the intensity falloff of the light. Move the mouse until the circle includes the cylinder and most of the floor. Then click again to finish the creation.
7. Adjust the viewing angle and render the view. Now the point light casts a shadow of the cylinder to the floor. The shadow is 'perspective' - its width grows towards the top of the cylinder. There is another kind of light source available, which sends light from infinitely far away - namely the distant light source. All light rays from a distant light source are parallel and therefore its shadows do not have any perspective distortion. Let's experiment with the distant light source next.
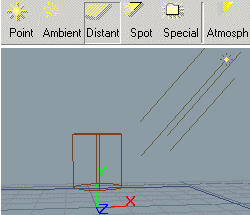
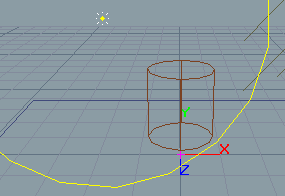
The distant light8. Take a front view. Activate the 'Distant' light source tool from the 'Light Sources' tool tab. Define the direction of distant light ray with two clicks on a view window. For example, draw the direction line down and left as shown in the image below.
A distant light source added Note, that the length of the axis is not important, nor the position of it. You can even place the distant light source below the floor, and it still illuminates the upper side of the floor! The only relevant geometric property is the direction of the rays. 9. Render the view again (e.g. hit the zero key).
Shadows from a point light and a distant light
Soft shadowsNow you should see two shadows of the cylinder on the floor. The edges of the shadows from both lights appear to be sharp. Do this to see a soft shadow: 10. Select the 'Light point' object from the select window. Open the property window and go to the 'Spec' tab. Here you can see the point light specific object attributes. Enter a non-zero value to the 'Size' field, for example 0.05 meters. Note that five centimeters is quite a realistic size for a light source. The bigger the size, the smoother the shadow boundary becomes. On the other hand, the distance from a light source to the target also affects the result - the sun, despite of its huge size, casts sharp shadows, because it is so far away from the earth. 11. Set the 'Quality' slider to the level 6. This slider controls the rendering accuracy of the light source: the higher the value, the better the rendering quality. However, improved quality means longer rendering times. If the smooth area on the shadow edge is wide, the quality setting has to be relatively high. Only slightly smooth shadows can be computed using lower quality. Usually values from 3 to 10 are suitable. 12. Render the view. This time one of the shadows has a smooth edge. Rendering is slower, but probably the extra realism is worth the time penalty.
Tip: Using a high level of anti-aliasing (especially stochastic anti-aliasing) also increases shadow quality. Therefore, the point light quality can often be relatively low in 'final' high-quality rendering.
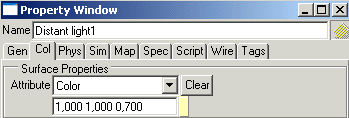
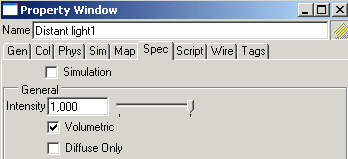
Color and intensitySo far, we have not paid any attention to the brightness of the inserted light sources. The brightness is defined by the usual object color and so called Intensity which is a light source specific property. The total brightness is a combination of these two: Intensity=0.5, Color=(1, 1, 1) is equal to Intensity=1, Color=(0.5, 0.5, 0.5). We can test the effect of these attributes in our sample scene: 13. Select the 'Distant Light' object. Open the property window and go to the 'Col' tab. Since distant lights usually simulate sun light which is slightly yellow, change the 'Color' of the distant light to pale yellow (1, 1, 0.7).
14. Go to the 'Spec' tab. Since sunlight is quite bright, increase the 'Intensity' from the default value 0.5 to 1.0.
15. Render the view. Since the distant light was only slightly yellow, it can be difficult to see the effect of the color change in our colored test objects. Compare the color inside shadows - that shows the effect best. Remember that when trying to achieve a certain 'atmosphere' in an artificial world, even subtle changes can be significant. Note: The intensity value is not limited to 1. In the real world, the brightness of objects can vary enormously - the sun is millions of times brighter than a candle flame. Realsoft 3D is designed to deal with such differences. However, computer monitors or printed images can not duplicate this kind of phenomena. Therefore, use high intensity light sources with care: The result can be an over-exposed image showing plain white.
Controlling the falloffThe two light sources of our test scene illuminate the whole universe. If you insert a new object 100 kilometers away from the cylinder, it is as brightly illuminated as the cylinder. This makes sense for the distant light source, which is 'almost infinitely' far away. However, it is quite a strange property for a point light, which usually simulates light sources such as a light bulb. Let's enhance the strange behavior of the point light: 16. Select the point light source, open the property window and go to the 'Spec' tab. Increase the 'Intensity' value to 1.0. Then render the view to see the result. Let us analyze the result a bit: The floor now looks almost white. The color of the floor remains the same, but it is becoming so brightly illuminated that our 'film' (=computer monitor) gets over-exposed. The right edge of the floor is slightly darker - not because the point light is weaker there, but because light rays from the point light hit the floor at a smaller angle. We can compensate for the increased lighting intensity by selecting a suitable light falloff distribution for the point light. 17. The point light being selected, go to the 'Spec' tab of the property window. The 'Falloff' part of the window contains a falloff type selector. Select 'Distance squared'. This means that intensity of the light decreases by the square of the distance - a point twice as far as the cylinder will receive only one fourth of the light.
This kind of falloff is physically correct for very small point-like light sources. If the light 'Size' is greater than zero, 'Distance' can be give a more realistic result. Now render the view. The extreme brightness of the floor should now happen only close to the point light source. The bright area can be shrunk further by decreasing the 'Fallof radius' of the point light. The initial falloff radius was defined by the circle shown by the point light tool (see the step 6 above). You can now change the radius using the 'Spec' controls, or interactively as follows: 18. Make sure that the point light is selected, and hit the spacebar to enter the Edit mode. The point light source now shows a yellow circle in the view window. Move the mouse pointer over the circle so that the pointer changes. Then drag the circle towards the actual position of the light source, until the circle is about one half of the original size. Release the mouse pointer and hit the spacebar to exit the edit mode.
In the case of 'Distance' and 'Distance squared' falloff types, the falloff radius defines the distance where the light intensity is halved. The yellow circle edited above shows quite intuitively how the light decreases in your scene. 19. Render the view. The image brightness has returned to a suitable level. Note: In 'Local' falloff type, the circle shows the distance after which light intensity is zero. Note: The distant light source does not (and can not) have 'Falloff' controls. The intensity is constant everywhere.
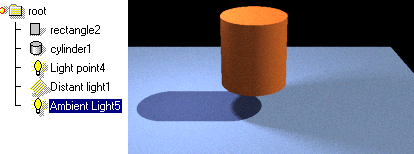
Ambient lightThe two shadows overlap slightly in the example scene. The area of overlap appears very dark, because only the weak flashlight illuminates it. If the viewing angle to the floor is small, the effect of the flashlight almost disappears. The Ambient light source can be used to add a uniform base lighting everywhere in the scene. Ambient light simulates light that scatters from the walls of a room, from clouds, etc. - such light does not have any specific direction and it illuminates all parts of the scene. 20. Click the Ambient tool of the 'Light Sources' tool tab. Then click two points on the view window. The position and the falloff radius are not important this time (an ambient light can also have a falloff distribution, but we will not use this feature in this tutorial).
21. The default intensity of the ambient light is also 0.5, which is quite high, since we already have many light sources. Change the 'Intensity' of the ambient light to 0.2 in the 'Spec' tab of the property window. Render the view - the shadowed areas are now better illuminated. Tip: one or two point light sources with 'Cast Shadow' option disabled often adds a more interesting base lighting to the scene than a single plain ambient light.
Controlling the overall brightness of the imageAt this point, the image is again quite bright. What if we want to decrease the brightness? Do we have to laboriously edit the intensity of each light source? Fortunately, the answer is no - there is an easier way. We can change the sensitivity of the film: 22. Open the view property window from the view's popup menu, and go to the 'Camera' tab. Decrease the 'Film sensitivity' value from 1 to 0.8.
A new test render shows that the image is now 20 % darker than before.
The special lightThe special light source object allows use of light sources of an arbitrary shape. This light source is a level object, which turns all sub objects into light sources. The sub objects can be any geometric objects such as NURBS curves or meshes. Tutorial level: Medium Example project: 'tutorprojects/rendering/speciallight' 1. To get started, model the cylinder-floor scene of the previous tutorial without the light sources, or delete the three light sources after finishing the previous example. 2. Click the Special light tool of the 'Light Sources' tool tab. Click 'Accept' to finish the tool.
3. Switch to the 'Analytic' tab and create an analytic sphere to the left side and above the cylinder. Open the property window and change the color of the sphere to a pale red: '1.0 0.5 0.5'. 4. Create a NURBS curve to the top right side of the cylinder. Using the property window, change the curve to a pale green: '0.5 1 0.5'. Then go to the 'Gen' tab and clear the 'Invisible in photorealistic rendering' option. This is important - otherwise the curve will be ignored in ray tracing! 5. Select the sphere and the curve and drop them into the sub hierarchy of the 'Special' light object. The object hierarchy and geometry should look as in the image below:
6. Select the special light source and go to the 'Spec' tab of the property window. Since we have only one light source included, increase the 'Intensity' from 0.5 to 1.0. 7. Adjust the 'Quality' value to about 10. The rule of thumb for this quality setting is the same as for the point light source: the bigger/closer the light source, the higher quality settings will be required. 8. Render the view to see the result. All shadows have smooth edges. Note also that the color of sub objects of the special light defines the color of the light.
Note: sub objects of a special light source do not define any surface - use object duplicates for this purpose.
|


 |
 |